For most people would be boring and also difficult install and setup software package to let them surf anonymously into the web, at this point it is possible make a plug and play low budget domestic device in an easy way, just follow the steps in this tutorial.
The low budget device is called Raspberry Pi and the Tor Network will be over it . Find here what exactly is Raspberry Pi, also what exactly is Tor.
Tor in the Raspberry Pi
The first step have written in the before post, once you become your Raspberry Pi in an access point, you will be able to install the additional packages. Tor install a text file called torrc that contains configuration instructions concerning how Tor package will works.
The first step is install Tor in the the Raspberry pi, many post agree with is better compile the TOR package, and certainly that is true, you can get the last version of Tor with all the last fixed bugs, but aims to get the things easy, I get the package from the repository, this install the 0.2.3.25 Tor version [Release april 12 2012]. This is enough for our purposes.
~$ sudo apt-get install tor
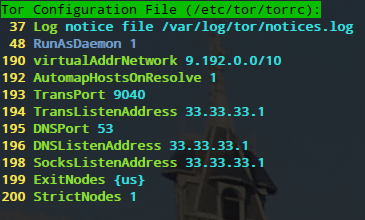
Once you have installed Tor is important have into account a log concerning what is happening inside Tor process, thus as the first step of configuration you have to uncomment one line of the default configuration. Below is showed how the file have to look like, see line number 37.
As a second step you can also uncomment line number 48 to let Tor run as a daemon. In the below picture is showed.
The first two lines of the picture above, related with torrc file [37, 48] are commented by default, so you can uncomment those ones as i did, the other part is the tipycal transparent proxy configuration; this configuration will carry on all traffic throught Tor network. All the request you do to your DNS will be redirected to the 9040 port.
Let’s check the other lines:
Lines [194, 196, 198] is the IP local address, for this case the Raspberry Pi address
Lines [199, 200] are there just in case you want to exit for an specific country, you can ommited them if you do not care about the country you want to reach an specific website, this lines could be useful to use services that only are avaible in others countries like Netflix service.
Now modify the /etc/resolv.comf file to avoid the DNS leakage
~# echo nameserver 127.0.0.1 /etc/resolv.conf
The last step in our Tor low budget device is make it run always you reboot your Raspberry (Just to let it plug and play).
~$ sudo update-rc.d tor enable
The Firewall Configuration Iptables
Once you have your tor file configured is time to lead your traffic in a strategic mode.
~$ sudo iptables -t nat -A PREROUTING -i wlan0 -p udp –dport 53 -j REDIRECT –to-ports 53
With the above rule all the DNS request will be redirect to the DNS port, that measn through the Tor network. Then just with other rule you can redirect all the TCP traffic throught Tor network too.
~$ sudo iptables -t nat -A PREROUTING -i wlan0 -p tcp –syn -j REDIRECT –to-ports 9040
The above rule tell iptables to transparently redirect tcp traffic destined for the Tor virtual address space through the Tor transport port you designated in the configuration file above. Now any onion addresses will be resolved, mapped into the 9.192/10 space, and transported through Tor.
Finally you have to save the firewall rules.
~$ sudo sh -c iptables-save > /etc/iptables.ipv4.nat
Top Bonus: I found a cool tool to monitoring the behavior of tor network, the package is called tor.arm, to get it just install it from the repository.
~$ sudo apt-get install tor-arm
Now just type the follow command and let it work.
~$ sudo -u debian-tor arm
With this tool you can monitoring the bandwidth, cpu, memory usage, relay’s current configuration, logged events, connection details (ip, hostname, fingerprint, and consensus data) etc.
Hope you find this post useful.


